What’s a pipeline?
In short: A Pipeline helps you to get your code (or in general: service) from Development (stage) to production (stage) in a short time, while providing the ability for automatic tests in a consistent environment.
What’s this about?
I”ll build a pipeline that builds a web server in a docker container, tests it’s functionality and finally deploys it into a production environment.
What’s needed?
- a functional kubernetes cluster
- a functional gitlab setup (make sure to set up runners too)
- basic knowledge about docker and docker file
Let’s go
The gitlab container registry has to be enabled, from 12.5 on it is enabled by default.
If you would like to put it on it’s own url, you may set:
gitlab_external_registry="name.domain.tld" in /etc/gitlab/gitlab.rb (for omnibus installation).Build a basic dockerimage with an installed lighttpd (checkout docker and docker file)
Setup a new project in gitlab and name it webserver, for example (checkout gitlab setup).
The Docker image
Create a Dockerfile with the following content (mkdir dockerfile, cd dockerfile, vi Dockerfile):
# Dockerfile for simple Lighttpd Server
FROM "gitlab.your.domain:4567/nikster/webserver/lighttpd:latest"

LABEL maintainer "yourmail@yourprovider.tld"
Label description "simple Webserver"

COPY lighttpd.conf /etc/lighttpd/
COPY start.sh /usr/local/bin/

CMD ["/usr/local/bin/start.sh"]
The important parts are:
FROM: it tells docker from where to get the base image (could be dockerhub as well, if you follow my docker tutorial)
COPY: we copy the lighttp.conf to it’s location.
This is the part of this setup that is most likely to change often and every time it does, we’ll commit it, push it and run it through our pipeline to be deployed in production.
Also we copy our own startscript and tell docker to execute it.
vi lighttpd.conf

server.modules              = (
            "mod_access",
            "mod_alias",
            "mod_accesslog",
            "mod_compress",
            "mod_status",
            "mod_redirect",
)

server.document-root		= "/var/www/"
server.upload-dirs		= ( "/var/cache/lighttpd/uploads" )
server.errorlog            	= "/var/log/lighttpd/error.log"
server.pid-file			= "/var/run/lighttpd.pid"
server.username			= "www-data"
server.groupname		= "www-data"

index-file.names           	= ( "index.php", "index.html", "index.lighttpd.html" )

accesslog.filename         	= "/var/log/lighttpd/access.log"
url.access-deny            	= ( "~", ".inc" )
static-file.exclude-extensions = ( ".php", ".pl", ".fcgi" )

## Use ipv6 only if available.
include_shell "/usr/share/lighttpd/use-ipv6.pl"

## virtual directory listings
dir-listing.encoding        = "utf-8"
server.dir-listing          = "enable"

#### compress module
compress.cache-dir          = "/var/cache/lighttpd/compress/"
compress.filetype           = ("text/plain", "text/html", "application/x-javascript", "text/css")

#include_shell "/usr/share/lighttpd/use-ipv6.pl " + server.port
include_shell "/usr/share/lighttpd/create-mime.assign.pl"
include_shell "/usr/share/lighttpd/include-conf-enabled.pl"

$HTTP["remoteip"] =~ "127.0.0.1" {
	alias.url += (
		"/doc/" => "/usr/share/doc/",
		"/images/" => "/usr/share/images/"
	)
	$HTTP["url"] =~ "^/doc/|^/images/" {
		dir-listing.activate = "enable"
	}
}
server.port			= 8080
server.bind			= ""
#$HTTP["host"] == "your.server.tld" {
#	dir-listing.activate = "disable"
#        server.document-root = "/var/www/whatever/"
#        accesslog.filename = "/var/log/lighttpd/webserver-access.log"
#}
$SERVER["socket"] == "127.0.0.1:80" {
        status.status-url = "/server-status"
}
This one should work, as you can see it’s listening on port 8080.
Now create the start script:
vi start.sh

#!/bin/sh

#NK: Source of this script: https://github.com/spujadas/lighttpd-docker/

tail -F /var/log/lighttpd/access.log 2>/dev/null &
tail -F /var/log/lighttpd/error.log 2>/dev/null 1>&2 &
/usr/sbin/lighttpd -D -f /etc/lighttpd/lighttpd.conf
it will start the server.
We’ll also create a small test script to do some Q&A in our pipeline:
vi script.sh

#!/usr/bin/env bash

set -e

echo-run() {
    echo "===== Testing if the webserver is running ===== $1"
    echo "$($1)"
    echo
}

declare MYHOSTNAME="$(hostname)"

echo-run "/etc/init.d/lighttpd start"
echo-run "hostname"
echo-run "netstat -antup"
echo-run "pwd"
echo-run "ls -al --color=auto ."
echo "curl -i http://${MYHOSTNAME}/"
Now may be a good time to commit and push.
The kubernetes setup
Kubernetes must be up and running (check out kubernetes cluster) so we can plug it into our gitlab.
In your Project, klick on:
- Operations
- Kubernetes
- add kubernetes cluster
- add existing cluster
You will be asked to fill in some information:
- Cluster Name – choose a name you like
- api url (find it on your cluster):
kubectl cluster-info | grep 'Kubernetes master' | awk '/http/ {print $NF}' - CA Certificate:
kubectl get secret <secret name> -o jsonpath="{['data']['ca\.crt']}" | base64 --decodeYou’ll also need a token (if you followed the kubernetes cluster howto, fetch it like this):
kubectl -n kube-system describe secret $(kubectl -n kube-system get secret | grep gitlab-admin | awk '{print $1}')If not or if something does not work, read this:
https://docs.gitlab.com/ee/user/project/clusters/add_remove_clusters.html#existing-gke-cluster
OK, now that kubernetes is plugged into gitlab, we need to tell it what services we want to deploy, how they can be accessed, and so on.
We do this with yaml files, that we’ll add to our gitlab project:
mkdir manifests
vi deployment.yaml

apiVersion: apps/v1
kind: Deployment
metadata:
  name: __CI_BUILD_REF_SLUG__
  namespace: kube-system
  labels:
    app: __CI_BUILD_REF_SLUG__
    track: stable
spec:
  replicas: 2
  selector:
    matchLabels:
      app: __CI_BUILD_REF_SLUG__
  template:
    metadata:
      labels:
        app: __CI_BUILD_REF_SLUG__
        track: stable
    spec:
      imagePullSecrets:
        - name: gitlab-admin
      containers:
      - name: app
        image: gitlab.your.domain:4567/user/webserver/webserver:__VERSION__
        imagePullPolicy: Always
        volumeMounts:
        - name: firmware
          mountPath: /var/www/firmware
        - name: balance
          mountPath: /var/www/balance
        - name: logvol
          mountPath: /var/log/lighttpd
        ports:
        - containerPort: 8080
        readinessProbe:
          tcpSocket:
            port: 8080
          initialDelaySeconds: 5
          periodSeconds: 10
        livenessProbe:
          tcpSocket:
            port: 8080
          initialDelaySeconds: 15
          periodSeconds: 20
      volumes:
      - name: firmware
        emptyDir: {}
      - name: balance
        emptyDir: {}
      - name: logvol
        emptyDir: {}
This will create a deployment object for kubernetes, based on our docker image, with 2 replicas and 3 volumes (in this case of the type empty dir: non persistent storage!).
Read more about storage here, if you are interested: https://kubernetes.io/docs/concepts/storage/persistent-volumes/
For simplicity the kube-system namespace is used here.
Now, let’s define the Service:
vi service.yaml

apiVersion: v1
kind: Service
metadata:
  name: webserver-__CI_BUILD_REF_SLUG__
  namespace: kube-system
  labels:
    app: __CI_BUILD_REF_SLUG__
spec:
  type: ClusterIP
  externalIPs:
  - 10.88.6.90
  externalTrafficPolicy: Cluster
  ports:
  - nodePort: 31808
    port: 8080
    protocol: TCP
    targetPort: 8080
  selector:
    app: __CI_BUILD_REF_SLUG__
  sessionAffinity: None
  type: LoadBalancer
status:
  loadBalancer: {}
Important parts here are:
- type ClusterIP – the IP the Service should be available at
- type LoadBalancer – as the name already states: Service will be behind the built in loadbalancer
Last, but not least we could create an ingress object (Service would also run without it but one would need a separate IP for every Loadbalancer, ingress routes requests by host- and servicename (URI).
Therefore an ingress controller needs to be deployed on kubernetes.
There are several: best known are nginx, haproxy and traefik.
(This isn’t necessary to get your first service online but cool, I’ve played with nginx and haproxy so far).
Read about how to deploy an haproxy ingress here: https://haproxy-ingress.github.io/docs/getting-started/
apiVersion: extensions/v1beta1
kind: Ingress
metadata:
  name: webserver-__CI_BUILD_REF_SLUG__
  namespace: kube-system
  labels:
    app: __CI_BUILD_REF_SLUG__
  #annotations:
   # kubernetes.io/tls-acme: "true"
   # kubernetes.io/ingress.class: "nginx"
spec:
  tls:
  - hosts:
    - __CI_BUILD_REF_SLUG__-gitlab.your.domain
    # the secret used here is an unsigned wildcard cert for demo purposes
    # use your own or comment this out
    secretName: tls-wildcard-demo
  rules:
  - host: __CI_BUILD_REF_SLUG__-gitlab.your.domain
    http:
      paths:
      - path: /
        backend:
          serviceName: webserver-__CI_BUILD_REF_SLUG__
          servicePort: 8080
Time to commit and push and then build the pipeline itself.
The Pipeline
Now, we need to glue it all together.
Therefore we create our pipeline definition for the Project (make sure this file in the root directory of your project):
vi .gitlab-ci.yaml

image: "gitlab.your.domain:4567/nikster/webserver/lighttpd:latest"

before_script:
  - docker login -u gitlab+deploy-token-1 -p <pass> gitlab.your.domain:4567

stages:
  - test
  - build
  - deploy

before_script:
  - apt-get update && apt-get install -y -o Dpkg::Options::=--force-confold net-tools lighttpd

my_tests:
  stage: test
  script:
  - echo "Running my tests in Environment $CI_JOB_STAGE"
  - echo "CI-BUILD-REF-SLUG $CI_BUILD_REF_SLUG"
  - ./script.sh

image_build:
  stage: build
  image: "gitlab.your.domain:4567/nikster/webserver/lighttpd:latest"
  script:
    - echo "Entering Environment $CI_JOB_STAGE"
    - echo "CI-BUILD-REF-SLUG $CI_BUILD_REF_SLUG"
#    - mkdir /etc/docker
#    - cp daemon.json /etc/docker/daemon.json
#    - cp docker_default /etc/default/docker
    - docker info
    - docker login -u gitlab-ci-token -p ${CI_JOB_TOKEN} gitlab.your.domain:4567
    - cat /etc/resolv.conf
    - docker build --no-cache -f dockerfile/Dockerfile -t gitlab.your.domain:4567/nikster/webserver/webserver:${CI_COMMIT_REF_NAME} .
    - docker tag gitlab.your.domain:4567/nikster/webserver/webserver:${CI_COMMIT_REF_NAME} gitlab.your.domain:4567/nikster/webserver/webserver:${CI_COMMIT_REF_NAME}
    - test ! -z "${CI_COMMIT_TAG}" && docker push gitlab.your.domain:4567/nikster/webserver/webserver:${CI_COMMIT_REF_NAME}
    - docker push gitlab.your.domain:4567/nikster/webserver/webserver:${CI_COMMIT_REF_NAME}

deploy_live:
  stage: deploy
  image: "gitlab.your.domain:4567/nikster/webserver/webserver:${CI_COMMIT_REF_NAME}"
  environment:
    name: live
    url: https://yourkubernetesclusterapi.your.domain
#environment:
#  only:
#    - master
#    - tags
#  when: manual
  script:
    - echo "CI_COMMIT_REF_NAME $CI_COMMIT_REF_NAME"
    - echo "Entering Environment $CI_JOB_STAGE"
    - echo "CI-BUILD-REF-SLUG $CI_BUILD_REF_SLUG"
    - mkdir ~/.kube
    - cp admin.conf ~/.kube/admin.conf
    - export KUBECONFIG=~/.kube/admin.conf
    - kubectl version
    - cd manifests/
    - sed -i "s/__CI_BUILD_REF_SLUG__/${CI_ENVIRONMENT_SLUG}/" deployment.yaml ingress.yaml service.yaml
    - sed -i "s/__VERSION__/${CI_COMMIT_REF_NAME}/" deployment.yaml ingress.yaml service.yaml
    - echo "VERSION $VERSION"
    - kubectl apply -f deployment.yaml
    - kubectl apply -f service.yaml
#   - kubectl apply -f ingress.yaml
#   - kubectl rollout status -f deployment.yaml
    - kubectl get all,ing -l app=${CI_ENVIRONMENT_SLUG}
- image: which docker image to use
- before_script: logs into our docker hub (on gitlab), I found that works best.
the second before_script directive updates all packages in the image to their latest version. - stage: here we define our three stages: TEST, BUILD and DEPLOY (maybe better called PROD)
In the TEST STAGE the pipeline executes the basic testscript we wrote to check if the service comes up and is available.
If QA is passed the new container is BUILD and the new image is pushed to our hub.
Then it is DEPLOYed on kubernetes .
I’ve also added lots of debug output to see what the pipeline does.
If you commit and push your changes, from now on the pipeline will be triggered on every commit.
Fetching the latest image, update it, test if lighttpd runs, build a new image and then deploy a 2x replicated and loadbalanced Service on kubernetes!
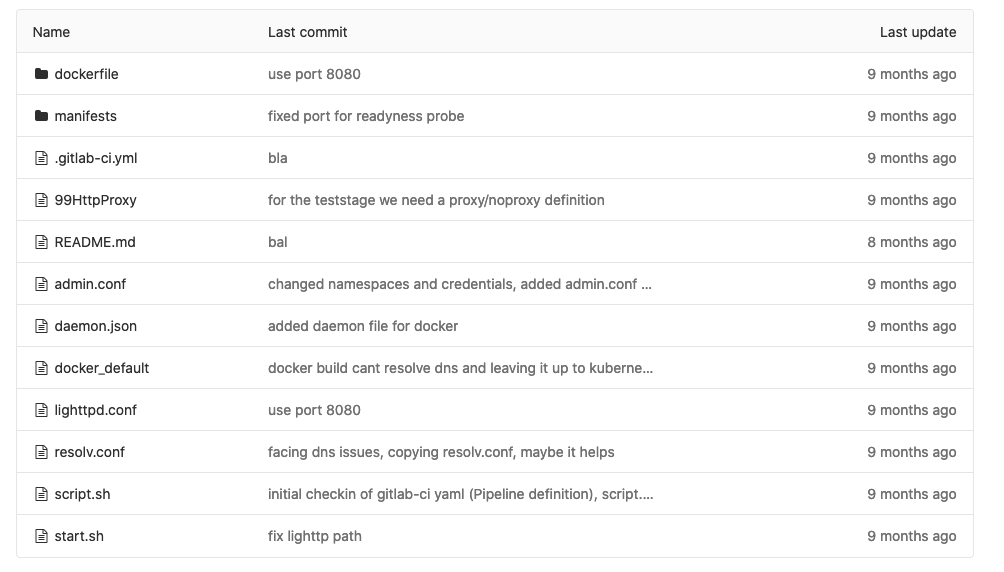
my project now looks like this (everything needed is described here):
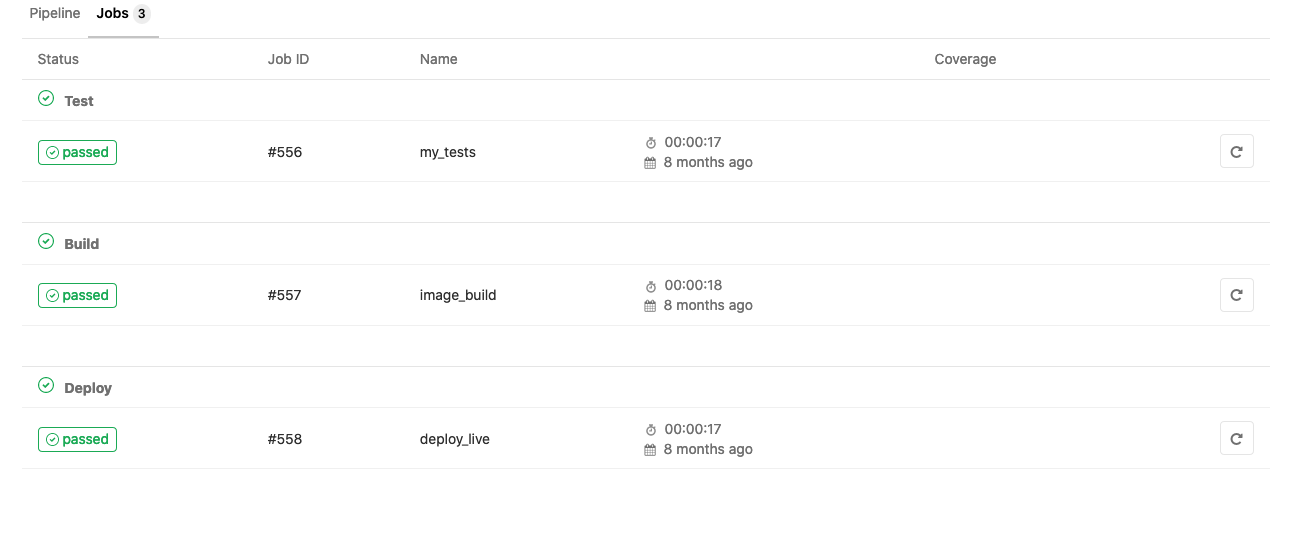
Pipelines look like this:

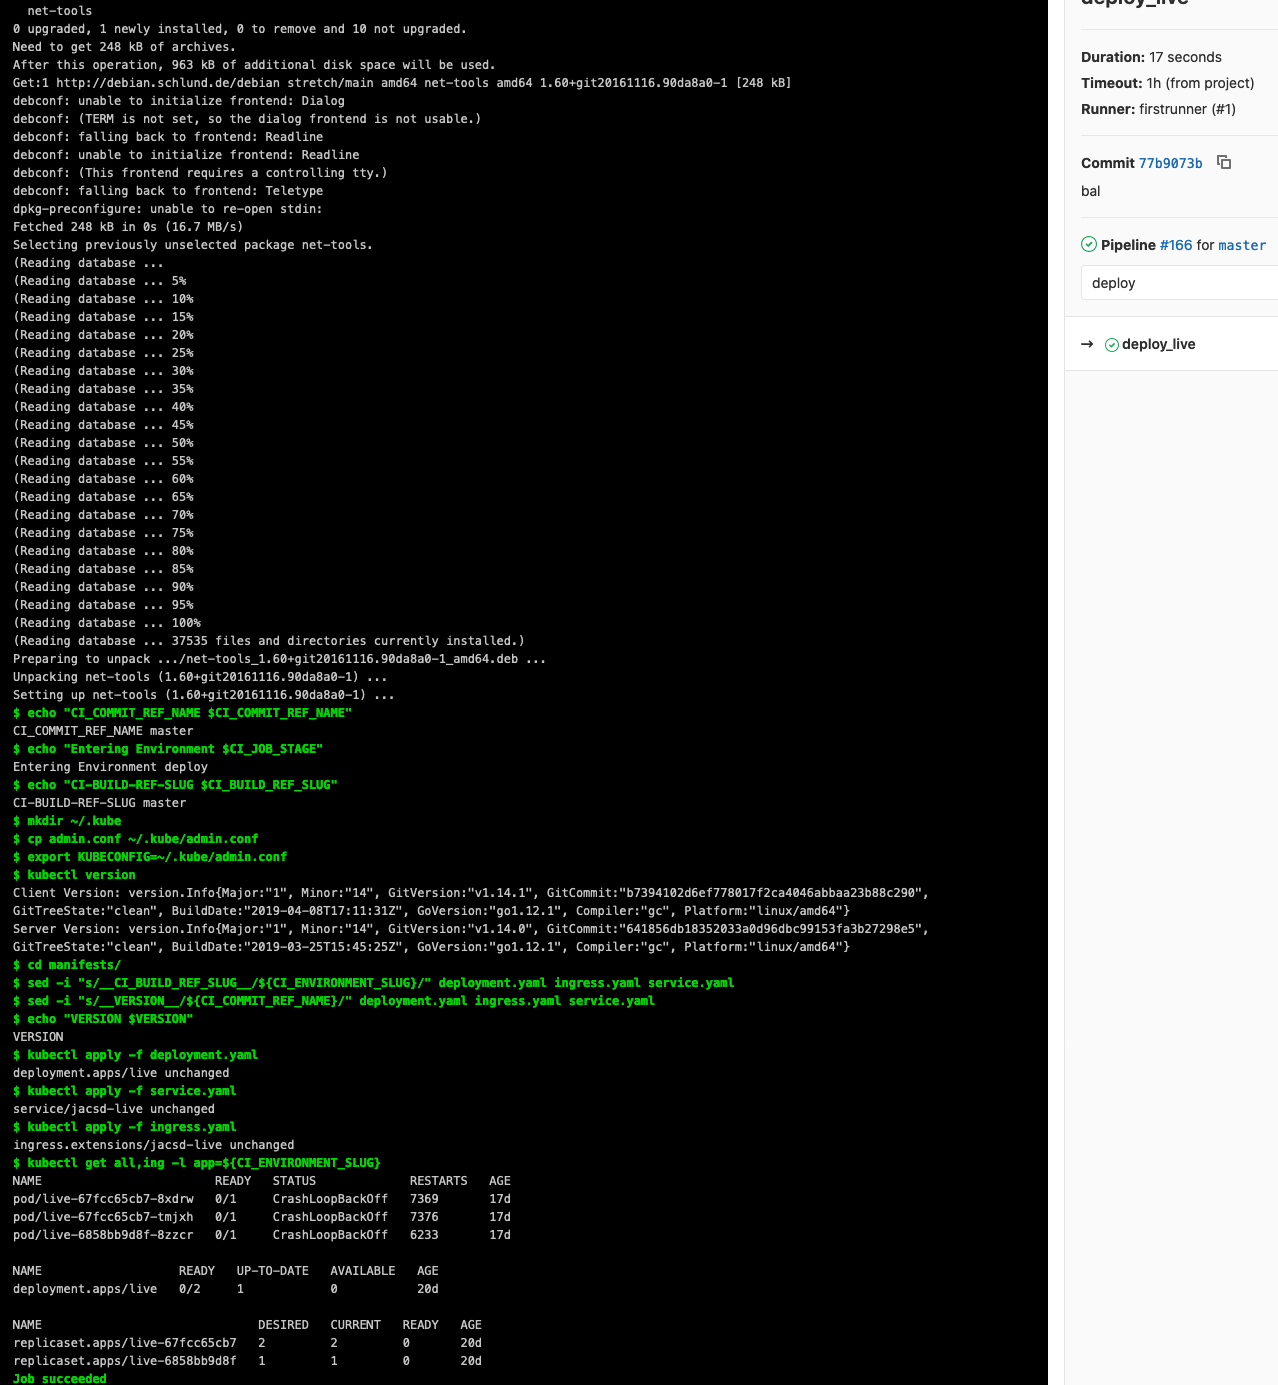
Our deployment is the last of the three: the replicaset.apps/thingy
Have fun playing around with this stuff! I had it.
Tips
At some point you might want/need to use a private gitlab registry for your docker images, then you’ll need kubernetes to log into gitlab and pull the image (works with private registries on dockerhub as well), here’s how to do it:
Check if a serviceaccount exists for your namespace, otherwise create one yourself:
kubectl get sa -n webservice-live
NAME                              SECRETS   AGE
default                           1         9h
webservice-live-service-account   1         9h
if none exists (better not use default):
vi my-service-account.yml

apiVersion: v1
kind: ServiceAccount
metadata:
  name: webservice-live-service-account
  namespace: webservice-live

kubectl apply -f my-service-account.yml
Now we’ll need a secret for our private registry, attached to our namespace:
kubectl create secret docker-registry gitlab-reg --docker-server='https://gitlab.my.domain:4567' --docker-username='validprojectusername' --docker-password='Validprojectuserpassword' --docker-email='myaddress@email.tld' -n webservice-live

secret/gitlab-reg created
check the secret like this:
kubectl get secret gitlab-reg --output=yaml -n webservice-live
apiVersion: v1
data:
  .dockerconfigjson: eyJhdxxxxxxxxxxxxxxxxxxxxxxxxxxxxxxxxxxxxxxxxlYWVdsMCJ9fX0=
kind: Secret
metadata:
  creationTimestamp: "2020-02-27T20:52:45Z"
  name: gitlab-reg
  namespace: webservice-live
  resourceVersion: "355279"
  selfLink: /api/v1/namespaces/webservice-live/secrets/gitlab-reg
  uid: 82f9675c-1967-4be9-9a5b-ac1c9e18b09a
type: kubernetes.io/dockerconfigjson
.dockerconfigjson object contains the base64 encoded credentials, if you encounter problems, check them like this:
root@kubernetes-master1:~# echo "eyJhdxxxxxxxxxxxxxxxxxxxxxxxxxxxxlYWVdsMCJ9fX0=" | base64 -d
{"auths":{"https://gitlab.my.domain:4567":{"username":"validgitlabprojectuser","password":"validgitlabprojectpassword","email":"mymail@email.tld","auth":"base64credsagain"}}}
now we may patch the secret into our serviceaccount:
kubectl patch serviceaccount webservice-live-service-account -p '{"imagePullSecrets": [{"name": "gitlab-reg"}]}' -n webservice-livewe see that the account now contains the secret named gitlab-reg:
kubectl describe sa webservice-live-service-account -n webservice-live                      Name:                webservice-live-service-account
Namespace:           webservice-live
Labels:              <none>
Annotations:         <none>
Image pull secrets:  gitlab-reg
Mountable secrets:   webservice-live-service-account-token-9pdx6
Tokens:              webservice-live-service-account-token-9pdx6
                     webservice-live-token
Events:              <none>
it’s usable in a (e.g deployment-) manifest now:
spec:
      serviceAccountName: webservice-live-service-account
      containers:
       - name: webservice
         image: gitlab.my.domain:4567/path/to/image:__VERSION__
         ports:
          - containerPort: 80
      imagePullSecrets:
       - name: gitlab-reg
technically you’ll need either serviceAccountName or imagePullSecrets in your deployment.yaml, here are both ways.